KeyboardTest FAQ
Q. My License key does not seem to work.
The license key must be correctly entered before the software turns itself into the licensed version. See this step by step guide for help.
Q. How do I run KeyboardTest in debug mode?
Placing the "/debug" text on the KeyboardTest command line will result in a log file being created.
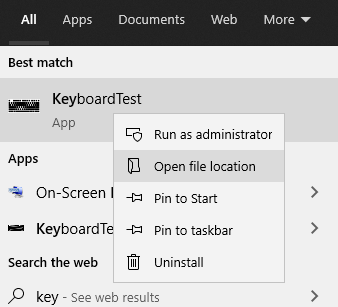
You can right click on the KeyboardTest icon in the start menu, choose "Open File Location" and the right click on the KeyboardTest shortcut to open the properties. After adding the /debug parameter, click OK to confirm the change and run the shortcut.
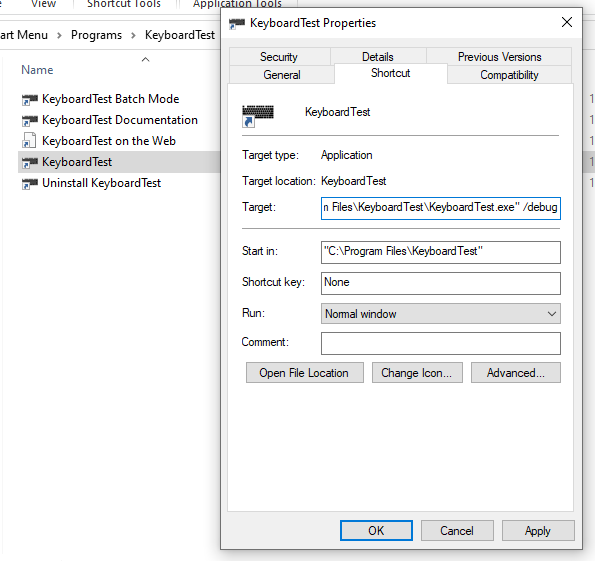
A popup will appear indicating where the log file was saved. Typically, the log file is located in the user's Documents directory: C:\Users\(user)\Documents\Passmark\KeyboardTest
Once the file has been created, you should mail them to us at help@passmark.com
Q. We manufacturer keyboards. How can we keep a record of each keyboard tested?
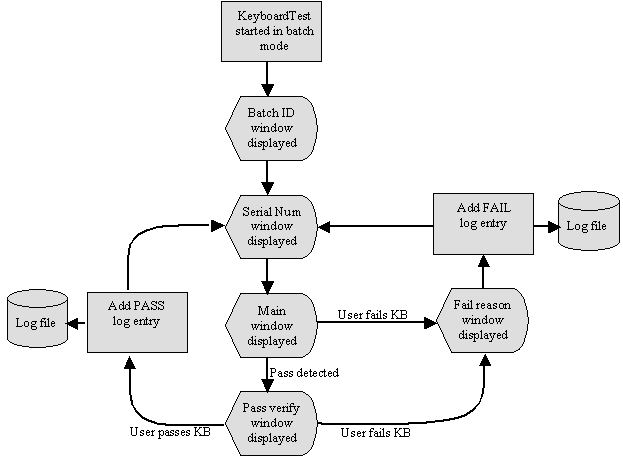
There is a new batch mode test option introduced in version 2.1 of KeyboardTest. This mode allows the logging of keyboards tested, errors, serial numbers, and other important details. Once in batch mode the program flow is as follows.
The /b command line parameter is used to place KeyboardTest into batch mode. You can add this option to the command line of KeyboardTest by right clicking on the icon for KeyboardTest and selecting properties. Then in the target field add /b at the end. Additional details on batch mode can be found the KeyboardTest help file that comes with the software.
Update: V4.0 and above:
There is also a 'KeyboardTest Batch Mode' shortcut in the Start Menu which you start batch mode from.
Q. When I press both Shift keys down, only the last released shift key is registered as coming up. Why?
When both shift keys (Windows code 0x10 or VK_SHIFT) are depressed, Windows only passes a shift KEYUP message for the last shift key released, to applications such as KeyboardTest. KeyboardTest is hence limited to detecting only the last shift key released.
Q. Only one shift key is registered by KeyboardTest when the key code is set in Windows, but both are registered when in BIOS mode?
Windows uses the same message when either of the shift keys are used.
Update: V4.0 and above:
KeyboardTest V4 should detect each shift key separately now.
Q. Is there a limit on how many custom keyboards I can have?
It is possible to add up to 100 custom keyboards for specialized user requirements.
Q. Are there any additional keyboard layouts available for download?
Yes, see the Keyboard Layout download page
Q. Can I send you my custom keyboard layout for addition to our web site?
If you have a keyboard that is not listed in the Keyboard Layouts page, and made a new layout file for it, please send it in and we will include it to the Keyboard Layouts page. Make sure to send in both the layout file and the bmp file. Mail these files to help@passmark.com
Q. How do I add a keyboard layout?
There are some additional keyboard layouts made by other people on the Keyboard Layout download page, but you can also make your own layout files.
For V4.0 and above:
- Create a new keyboard layout file <LayoutName>.kbl. This file will contain all the information about all the keys on a keyboard. See the included .kbl files that are installed as part of the KeyboardTest package in the Program files directory (typically C:\Program Files\KeyboardTest\Keyboards). Kbl files are in csv format. For more information on the structure of .kbl files see help documentation.
- Create a new bitmap file <LayoutName>.bmp. This should be a 1600 x 600 px picture of your new keyboard, though the image can be of any size. The name of this file should be the same as the .kbl file.
- Make sure both files are placed into the KeyboardTest, installation directory. Normally, C:\Program Files\KeyboardTest\Keyboards.
- On startup, KeyboardTest loads the first 100 .kbl files along with their corresponding bitmaps. A .kbl file with an incorrect format, or a .kbl file without the corresponding .bmp file will be flagged as an error.
Note: Keyboard layout files from older versions of KeyboardTest will not work unless you convert encoding of the .kbl file to UTF-16 LE.
For V3.2 and earlier:
- Create a new keyboard layout file <mylayoutname>.kbl. This file will contain all the information about all the keys on a keyboard. See the three examples (DellPortInt.kbl, DellPortUS.kbl and AT107 + Mouse.kbl) files that are installed as part of the KeyboardTest package in the Program files directory. Kbl files are in csv format. For more information on the structure of .kbl files see "Tell me more about keyboard layout files" below.
- Create a new bitmap file <mylayoutname>.bmp. This should be a 700-pixel x 340-pixel x 256 color close-up picture of your new keyboard. Again, see the three examples (files DellPortInt.bmp, DellPortUS.bmp & AT107.bmp). The name of this file should be the same as the .kbl file.
- Make sure both files are placed into the KeyboardTest, installation directory. Normally, C:\Program Files\KeyboardTest.
- On startup, KeyboardTest loads the first 100 .kbl files along with their corresponding bitmaps. A .kbl file with an incorrect format, or a .kbl file without the corresponding .bmp file will be flagged as an error.
Q. Tell me more about keyboard layout files.
Kbl files are comma separated variable (csv) text files. Each line of the file corresponds to one key. There should be no unnecessary white space. There are 10 mandatory values per line which define each key. These are followed by 11 optional fields that can be specified to define a compound key. A compound key is a single key on the keyboard that generates multiple key presses. For example, a keyboard generates the keys "W","W","W",".", when the compound key "WWW.", is depressed Thirty compound keys can be defined for each keyboard layout. Each value must be one of the following.
- A number value.
- A single character value. The character must be surrounded by single quotes. The character is converted to its ASCII code value as the file is read.
- A string value. Strings must be surrounded by double quotes.
Comments can be added by using a # as the first character in a line (see sample files).
The values in the order they must appear on each line of the .kbl file are as follows.
Windows ScanCode:
Windows scan code for this key (After language translation). This can be in 3 formats, a number, a single character, or a string value denoting a predefined constant (ref. Windows key codes reference in help). If the key being defined is a compound key, the string "COMPOUND" must be used for this field. If the key being defined is a Mouse button, the strings "LMOUSE", "MMOUSE" and "RMOUSE" must be used for the left, middle and right mouse buttons, respectively. For example:
#Mouse
"LMOUSE",0,"LMouse","true","KTSTATUSUP",0,619,13,24,27
"MMOUSE",0,"MMouse","true","KTSTATUSUP",0,644,13,7,27
"RMOUSE",0,"RMouse","true","KTSTATUSUP",0,652,13,24,27
OEMCode:
A number value which is the OEM scan code for this key (before language translation).
Name:
A string value denoting the name of the key eg "K", "Tab"
Extended Status:
A string value. "False" if part of normal keyboard, "True" if part of extended keyboard. E.g., Numeric keypad
Status:
A string value denoting the test status of the key.
"KTSTATUSNOTEST" = Don't test this key
"KTSTATUSUP" = Test this key (key starts in the up position)
"KTSTATUSFAIL" = This indicator is specific to compound keys. It is used to indicate that the defined compound key should be used for automatic testing of failures such as row and column hardware shorts. Specifically, when this status is used to define a compound key, KeyboardTest will check whether the defined keys (specified by up to 10 compound key characters) are pressed in any order (i.e. A hardware short) within the compound key timer limits described below.
Note 1: This compound key will be ignored when testing for the automatic pass condition.
Note 2: This key definition differs to a compound key defined with Status equal to KTSTATUSUP, which matches the keys in the order pressed.
Note 3: This indicator will be ignored when not in batch mode (no automatic failure or pass).
Reserved:
Number value. Not used but must be present in file and must be set to 0. Reserved for future expansion.
X, Y:
Number values. The X and Y offset of the key on the keyboard image in pixels, (Top Left corner). Note: Getting these values and the width and height values correct can take some time and trial and error.
Width, Height:
Number values. The Width and Height the key on the keyboard image in pixels.
COMPOUND KEYS - OPTIONAL PARAMETERS:
The following parameters are required to define a compound key:
If the key being defined is not a compound key, the Height value (described above) must be the last entry on the line.
If the key being defined is a compound key, the Compound key timer must be specified, followed by the characters (specified as Windows ScanCode decimal numbers). At least one character must be defined for a compound key, up to a maximum of 10. Each parameter must be separated by a ",". For example, to define "WWW.", as a compound key, the following should be included in the .kbl file:
"COMPOUND",0,"WWW.","true","KTSTATUSUP",0,26,95,20,29,250,87,87,87,190
Where 500 is the Compound key timer (described below), 87 (Hexadecimal 57) is the Scancode for "W" and 190 the Scancode for ".".
If the key being defined is a compound key for testing for failure due to hardware shorts, the Compound key timer must be specified, followed by the characters (specified as Windows ScanCode decimal numbers). At least one character must be defined for a compound key, up to a maximum of 10. Each parameter must be separated by a ",". For example, to define a short between rows 1 and 2, select one key from each row (e.g., "ESC" and "`"", ie. 27 and 192) and add the following to the .kbl file:
"COMPOUND",0,"Row1-2: Short","true","KTSTATUSFAIL",0,26,118,420,29,200,27,192
Compound key timer:
Number value. The Compound key timer indicates a maximum value (in ms) between characters generated by the keyboard when a compound key is depressed. For example, the maximum time allowed between one "W" and the next "W" being received. If this timer value is exceeded, the key presses will be treated as individual key presses and not a compound key.
Compound key characters - Windows scan codes:
A comma separated list of between 1 and 10 number values. Windows scan code for each of the compound key characters (after language translation), specified as a decimal number (see above example).
NOTE:
We recommend that the best way to create a custom layout file is to make a copy of one of the three existing sample files and edit the lines as necessary.
Q. Can I run KeyboardTest from a USB drive?
For V4.0 and above:
- On the main window, click on the Options button
- In the options window, click on 'Install to USB drive'
- In the Install to USB window, select the directory to install to, installation type, and license key (for licensed install)
- Then click Install for installation to start.
For V3.2 and earlier:
- Copy all the files where KeyboardTest is installed (e.g. C:\Program Files\KeyboardTest) onto the USB you want to run the program from.
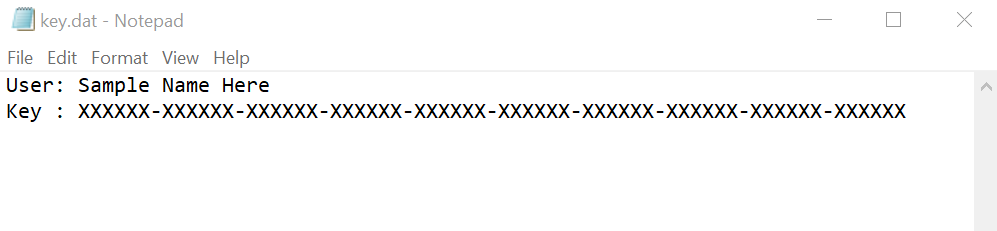
- Create a "key.dat" file and save that in the same directory you copied the above files to.
- The text inside the "key.dat" file should be like the below image:
- Run "KeyboardTest.exe" on the USB and it should be licensed.